Updating Elementor, Elementor Pro, WordPress, a theme, and several add-ons at once makes failures hard to attribute. A backup helps only when it is complete and restorable; a staging site helps only when it resembles production and someone tests the workflows that matter.
This Elementor update checklist turns an update into a controlled change: record the current state, understand dependencies, test on staging, deploy in a sensible order, verify real workflows, monitor, and roll back when defined conditions fail.
Quick answer: Before updating, verify a current full-site backup, create a production-like staging copy, record versions and baselines, read changelogs, check add-on compatibility, define acceptance tests, update one dependency group at a time, clear/regenerate caches when required, test critical workflows while logged out and in, then deploy during a monitored window with a written rollback path.
1. Decide how much process the update needs
| Change | Typical risk | Process |
|---|---|---|
| Small patch/security release | Low to urgent, depends on advisory | Backup, targeted staging smoke test, prompt deploy |
| Elementor/Pro minor feature release | Medium | Changelog, add-on compatibility, staging regression |
| Major Elementor/WordPress/PHP change | High | Full staging test, maintenance window, rollback rehearsal |
| WooCommerce/payment/membership dependency | High business impact | Transaction and callback testing with owner approval |
| Known exploited vulnerability | Urgent | Contain/update quickly; do not delay solely for normal cadence |
Security urgency and operational risk must be balanced. “Wait several weeks for every update” and “auto-update everything immediately” are both weak universal policies.
2. Record the current state
- WordPress, PHP, database, theme, Elementor, Elementor Pro, and add-on versions
- Active, network-active, must-use, and drop-in plugins
- Elementor System Info and compatibility warnings
- Current error logs, Site Health issues, scheduled-action backlog, and disk space
- Performance baseline for representative public and logged-in pages
- Screenshots of header, footer, key templates, mobile states, forms, popups, and checkout
- Active licenses, connected services, webhooks, API keys, and cache/CDN setup
The WordPress plugin audit checklist provides a deeper dependency inventory. Recording the baseline prevents an old warning from being blamed on the new release.
3. Verify the backup and restore path
- Include the database, WordPress files, uploads, plugins, themes, and configuration.
- Store a copy outside the same server.
- Confirm the backup completed without errors and can be downloaded or restored.
- Know whether restoring will overwrite new orders, form submissions, users, bookings, or comments.
- Record credentials and the person authorized to perform the restore.
- For busy sites, plan how to preserve transactions created after the backup.
Warning: Restoring yesterday’s full database on a live store can remove today’s orders. A rollback plan for transactional sites may require file rollback, selective data handling, maintenance mode, or hosting support rather than a blind full restore.
Also confirm what your backup captures. See whether a standard WordPress backup saves Elementor global settings.
4. Build a production-like staging site
- Match PHP, server software, caching, CDN behavior, and relevant configuration.
- Refresh stale staging data when schema, templates, or integrations changed.
- Block public indexing and prevent staging email, SMS, payment, CRM, and webhook side effects.
- Use test/sandbox credentials where integrations support them.
- Confirm Elementor Pro and commercial add-on licensing works on the staging domain.
- Document differences that prevent a perfect match.
A local copy is useful but may not reproduce production caching, firewall, filesystem, PHP extensions, or CDN behavior. Use it with that limitation in mind.
5. Read changelogs and compatibility signals
- Read Elementor Core and Pro changelogs, known issues, and migration notes.
- Check the theme and every Elementor add-on for compatibility statements.
- Review deprecated features, experiments/features, CSS/DOM changes, and minimum PHP/WordPress requirements.
- Identify database migrations or background upgrade tasks.
- Download previous plugin versions only from trusted official/vendor sources if rollback may require them.
Tip: Screenshot or export Elementor System Info before the change. Version and compatibility details are much easier to discuss with support when the pre-update state is recorded.
6. Define acceptance tests before clicking Update
| Area | Acceptance test |
|---|---|
| Templates | Header, footer, single, archive, 404, search, mobile menu |
| Editor | Open, edit, responsive preview, save, publish, revision |
| Forms | Validation, submission, storage, email, CRM/webhook, success state |
| Dynamic content | ACF/custom fields, loops, filters, pagination, empty states |
| Popups | Triggers, conditions, focus/close, cookies, mobile display |
| Commerce | Product, variation, cart, coupon, checkout, payment callback, email |
| Accounts | Login, logout, password reset, role access, protected content |
| Performance | No new 404/console/PHP errors or material regression |
| SEO | Canonical, robots, schema, sitemap, titles remain correct |
Define the expected result and who signs it off. “Browse around and see if it looks okay” will miss delayed emails, webhooks, scheduled actions, and role-specific pages.
7. Update staging in a controlled order
There is no universal order for every stack. Follow dependency and vendor guidance. For an Elementor site, update compatible add-ons when required, keep Elementor Core and Pro on compatible versions, and avoid leaving a mismatched pair longer than necessary.
- Take a staging snapshot.
- Apply one logical dependency group.
- Wait for database/background upgrades to finish.
- Clear Elementor files/data and caches only when required.
- Run targeted tests immediately.
- Record results before the next group.
Bulk updating twenty unrelated plugins makes root-cause analysis needlessly difficult. For update-related CSS failures, use the Elementor custom CSS troubleshooting guide after it publishes.
8. Test the full staging matrix
- Test logged out, administrator, customer/member, and relevant staff roles.
- Use desktop and real mobile devices, not only the editor preview.
- Check browser console, Network failures, PHP logs, and scheduled queues.
- Test fresh and cached requests.
- Confirm generated Elementor CSS files load from the live staging domain.
- Run visual comparisons for representative templates.
- Repeat performance tests under the same conditions and compare medians.
9. Prepare production deployment
- Choose a low-risk window with the right people available.
- Notify stakeholders and pause campaigns/imports if needed.
- Take a fresh production backup immediately before updating.
- Record the exact versions approved on staging.
- Prepare maintenance mode for changes that can interrupt transactions.
- Define rollback triggers, such as failed checkout, broken editor, widespread layout loss, or database errors.
10. Deploy, verify, and monitor
- Apply only the approved versions and sequence.
- Complete required migrations.
- Regenerate Elementor files/data and purge caches deliberately.
- Run the production smoke test immediately.
- Check external services actually received test events.
- Monitor error logs, uptime, orders/leads, scheduled actions, and support reports.
- Keep the change record and observation window open.
When to roll back
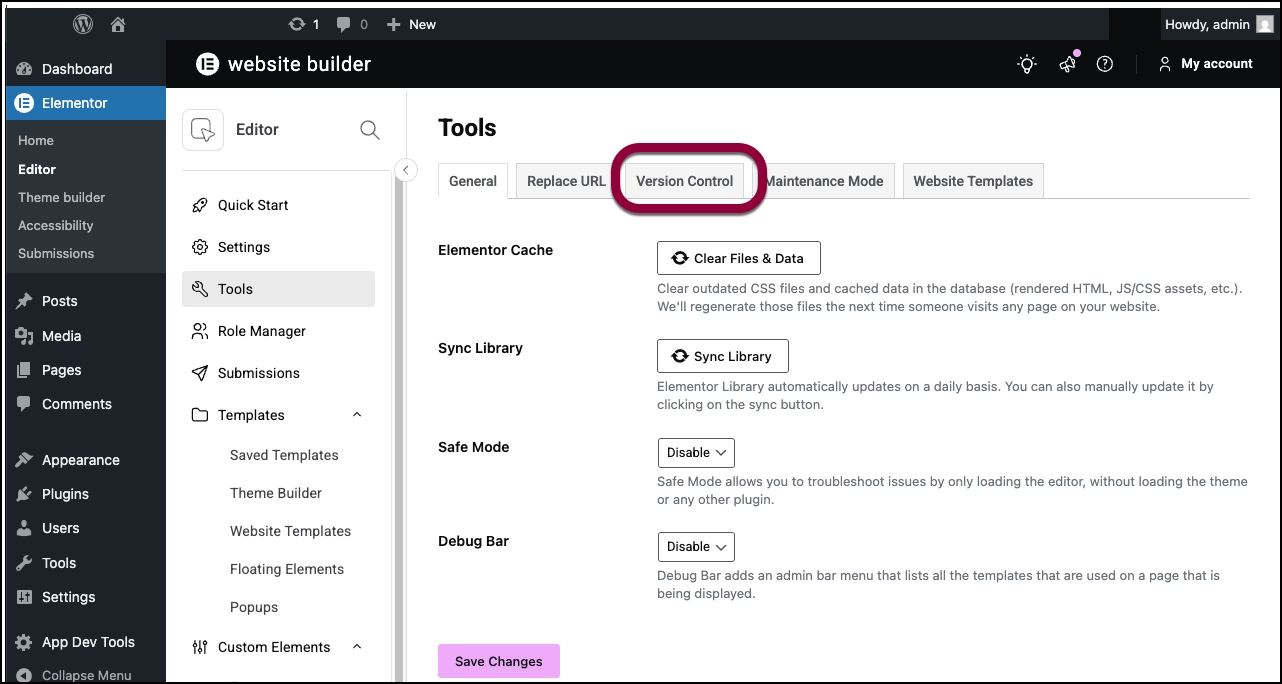
Roll back when a defined critical test fails and a safe fix is not immediate. Elementor’s Version Control can reinstall an earlier Elementor version, but it does not necessarily reverse database migrations, Elementor Pro, add-ons, theme changes, WordPress core, PHP, or new transactional data. Use the recovery method that matches what changed.
Success: A successful update is not simply a green “updated” message. The approved versions are live, critical workflows pass, integrations receive events, logs remain clean, performance is within tolerance, and the rollback window closes with documented evidence.
Sources
- Elementor: Steps before updating
- Elementor: Roll back a version
- WordPress update documentation
- WordPress plugin/theme auto-updates
For a managed update, staging review, or recovery plan, see AbdullahWP services.