When Elementor custom CSS appears in the editor but not on the live page, repeatedly clearing caches can waste time. The failure normally belongs to one of four layers: the CSS was not generated or delivered, the selector does not match, another rule wins, or the browser is showing a different cached page.
This troubleshooting flow shows how to identify the failing layer with browser developer tools, then apply the smallest safe fix.
Quick answer: Inspect the live element, check whether your declaration appears in the Styles panel, and see whether it is active or crossed out. Missing CSS points to saving, generated files, caching, conditions, or the wrong page. A crossed-out declaration points to cascade, specificity, order, media queries, or !important. A visible active rule points to invalid values or another property controlling the result.
First identify the exact symptom
| Symptom | Likely layer | First check |
|---|---|---|
| Works in editor, not live | Generated file, cache, or selector context | Inspect live page while logged out |
| Rule appears crossed out | Cascade/specificity | Find the winning declaration |
| Rule is absent | Save, file, condition, or wrong page | Search loaded stylesheets |
| Works on desktop only | Media query or responsive override | Inspect at failing viewport |
| Randomly breaks | Cache/CDN/file generation | Check CSS request status and URL |
| Selector matches zero elements | Wrong class, DOM, or selector usage | Test selector in Elements panel |
Step 1: Inspect the live element
- Open the public URL in a private window.
- Right-click the affected element and choose Inspect.
- In Styles, search for the property or a unique value from your CSS.
- Check the Computed panel to see the final value and which rule supplied it.
- Note the stylesheet URL, selector, media query, and whether the declaration is crossed out.
This immediately separates delivery from cascade problems. If the declaration is loaded and crossed out, clearing the cache cannot make it win.
Step 2: Confirm the selector matches
Element-level Elementor Pro CSS supports the selector placeholder. Elementor replaces it with the current element’s wrapper. Use it only in the element’s Custom CSS field:
selector .elementor-button {
  background-color: #5b2a86;
}

selector:hover {
  transform: translateY(-2px);
}
In page-level, site-level, theme, or external CSS, selector is not replaced and matches nothing. Use a stable class you assigned under Advanced, such as .pricing-card, instead of copying Elementor’s generated element ID when the style should be reusable.
- Check dots for classes and
#for IDs. - Confirm spaces and child combinators match the actual nesting.
- Do not write SCSS nesting in a field that accepts plain CSS.
- Close braces and comments; one syntax error can invalidate following declarations.
- Check whether a popup, loop item, header template, or duplicate mobile widget uses another element instance.
Tip: Add a temporary unmistakable declaration such as outline: 4px solid red;. If it appears, delivery and matching work; investigate the original property rather than caches.
Step 3: Understand why another rule wins
CSS uses origin, importance, cascade layers, specificity, scoping, and source order. The longest selector is not automatically the right fix. Inspect the winning rule and make your rule appropriately specific without tying it to fragile generated markup.
/* Too broad */
.elementor-button { color: white; }

/* Scoped to a deliberate custom class */
.checkout-cta .elementor-button { color: white; }
Use !important only when you understand the competing declaration and cannot control its source. Stacking more !important rules creates a maintenance problem and can break responsive states.
Step 4: Check responsive conditions and CSS variables
- Inspect at the exact failing viewport; Elementor breakpoints may differ from a copied tutorial.
- Look for a later mobile/tablet rule overriding the desktop declaration.
- Check whether the property is inherited from a parent or supplied by a CSS custom property.
- Verify hover styles on devices that actually support hover.
- For flex/grid positioning, inspect parent layout properties; changing the child may not control alignment.
Step 5: Clear Elementor files and the correct cache layer
If the rule is missing or a generated CSS request is stale, go to Elementor > Editor > Tools and use Clear Files & Data, then clear the relevant page cache, hosting/server cache, CDN cache, and finally browser cache.
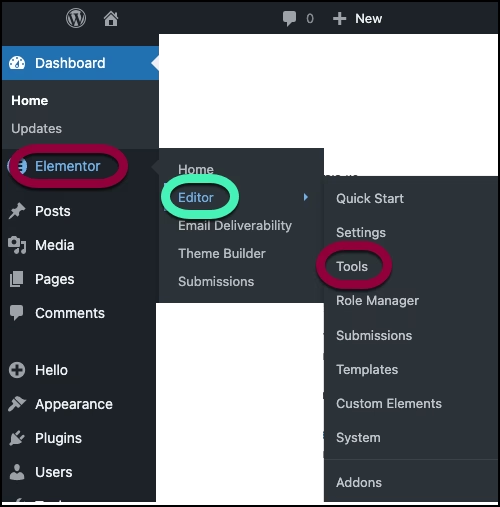
Purge in that order so downstream caches do not preserve an older upstream response. Then retest logged out. Do not disable every optimization option permanently; isolate which layer served the stale file.
Warning: Do not manually delete random files in wp-content/uploads/elementor/css on production without a backup and a regeneration plan. A permissions, disk-space, URL, or CDN problem can prevent replacement files from being written.
Step 6: Inspect the generated CSS request
- Open Network, filter by CSS, and reload.
- Check the expected Elementor CSS request returns 200, not 404/403/5xx.
- Open the response and search for your unique declaration.
- Check the URL uses the live HTTPS domain, not staging or HTTP.
- Review response headers to identify browser, CDN, host, or plugin caching.
- Confirm WordPress can write to the uploads/Elementor CSS directory and disk space is available.
After a migration, use Elementor’s supported URL replacement and file regeneration rather than a blind database replacement. Mixed-content and old-domain paths are common causes of editor/live differences.
Step 7: Check where the CSS was added
| Location | Scope | Common failure |
|---|---|---|
| Element Custom CSS | That widget/container instance | Using selector elsewhere |
| Page settings | Current Elementor page | Editing a template or translated page instead |
| Site Settings | Elementor site scope | Theme/add-on wins later |
| Theme/Customizer | Theme-defined scope | Not loaded on canvas/template contexts |
| Child theme file | Enqueued site scope | File not enqueued or cached |
Step 8: Isolate conflicts safely
On staging, test with Elementor and Elementor Pro only, then re-enable the theme and add-ons systematically. Check optimization plugins, CSS/JS managers, security/CDN rewriting, multiple builders, and add-ons that replace Elementor widgets. Preserve a record of each change.
If the editor itself will not load, use the separate Elementor editor troubleshooting flow. If many pages are broken after an update, follow a rollback and staging process rather than fixing selectors page by page.
Success: You have found the cause when you can point to the missing request, unmatched selector, invalid declaration, winning rule, media query, or cache layer. Document that evidence before changing the production site.
Sources
For a hands-on diagnosis, see the AbdullahWP services.